Showing posts with label your. Show all posts
Showing posts with label your. Show all posts
Tuesday, March 10, 2015
Publish your scripts to the Apps Script Gallery
Today, we are excited to make Google Apps Script available to everyone. Some of you may already be familiar with Google Apps Script within Google Apps, but in case you are new to it, Google Apps Script provides a powerful and flexible scripting environment that lets you automate actions across your spreadsheets, sites, calendars, and many other services.
An important new feature of Apps Script is a script gallery, where developers can easily publish their scripts to make them accessible to everyone. You can find the gallery by going to Insert and then selecting Script...in any Google spreadsheet.
Recently, the Google Apps team in New York put together a Movie Night script to help us easily figure out which movies were playing nearby and vote for our favorites - you can read more about it here. Let’s take a closer look at how the script works and how we published it to the new Apps Script Gallery.
We start by bringing up the script editor from a spreadsheet (Tools -> Scripts -> Script editor...).
The first step is to fetch a list of movies playing in a given area at a given time. We use the Google search results for a movie query as follows:
varresults = UrlFetchApp.fetch(http://www.google.com/movies?hl=en&near=+
zipcode +&dq=movies&sort=1).getContentText();
vardoc = Xml.parse(results,true);
We can then use Apps Script’s handy Xml service to parse the results. The next step is to send an email to our friends asking them to vote. This is the slightly tricky part:
Phew! That was the tricky part. In summary, we just created a form for the spreadsheet, but instead of using that form directly, we’re going to use a form that is dynamically generated by the script. However, we still need the special key to correctly route submissions to the spreadsheet (and to validate those submissions).
After that, we can put together a list of recipients by calling the contacts service and reading the Gmail ‘Friends’ group:
varcontactGroup = ContactsApp.findContactGroup(’System Group: Friends’);
varpeople = contactGroup.getContacts();
Lastly, we put the movie thumbnails and descriptions in the email body - tailored to each recipient, so that we’ll know who voted:
varemailBody = "";
for(variinmovies) {
// add the image, title etc to emailBody (as HTML)
}
varaddresses = getFriends_();
for(variinaddresses) {
var email = email_header + form_key + emailBody + email_footer;
MailApp.sendEmail(addresses[i],"Movie tonight?", "", {htmlBody: email});
}
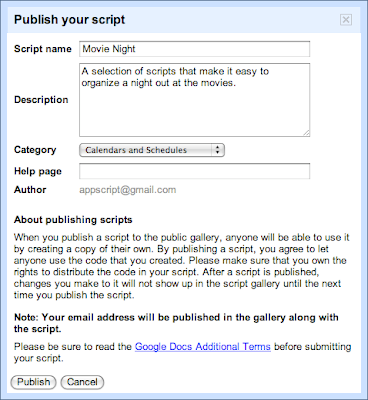
Check out the documentation and get started building your scripts - we look forward to seeing your gallery submissions. To share your masterpiece with the world, select Share -> Publish Script...from the script editor - its that easy!
Also, for those attending Google I/O this year, be sure check out the Google Apps Script talk on the Enterprise track.
Posted by Nikhil Singhal, Google Apps Script Engineer
Read more »
An important new feature of Apps Script is a script gallery, where developers can easily publish their scripts to make them accessible to everyone. You can find the gallery by going to Insert and then selecting Script...in any Google spreadsheet.
Recently, the Google Apps team in New York put together a Movie Night script to help us easily figure out which movies were playing nearby and vote for our favorites - you can read more about it here. Let’s take a closer look at how the script works and how we published it to the new Apps Script Gallery.
We start by bringing up the script editor from a spreadsheet (Tools -> Scripts -> Script editor...).
The first step is to fetch a list of movies playing in a given area at a given time. We use the Google search results for a movie query as follows:
varresults = UrlFetchApp.fetch(http://www.google.com/movies?hl=en&near=+
zipcode +&dq=movies&sort=1).getContentText();
vardoc = Xml.parse(results,true);
We can then use Apps Script’s handy Xml service to parse the results. The next step is to send an email to our friends asking them to vote. This is the slightly tricky part:
- In the spreadsheet, select Form -> Create a form to open the form creation window.
- Add two questions, one titled “Movie”, and the other “Attendee” - we don’t care too much about any other text as it will all be replaced by the script at run-time.
- Close the form creation window.
- In the spreadsheet, select Form -> Go to live form, and copy the ‘formkey’ parameter from the address bar.
- Open the script in the editor, and insert the ‘formkey’ into line 2 of the script.
Phew! That was the tricky part. In summary, we just created a form for the spreadsheet, but instead of using that form directly, we’re going to use a form that is dynamically generated by the script. However, we still need the special key to correctly route submissions to the spreadsheet (and to validate those submissions).
After that, we can put together a list of recipients by calling the contacts service and reading the Gmail ‘Friends’ group:
varcontactGroup = ContactsApp.findContactGroup(’System Group: Friends’);
varpeople = contactGroup.getContacts();
Lastly, we put the movie thumbnails and descriptions in the email body - tailored to each recipient, so that we’ll know who voted:
varemailBody = "";
for(variinmovies) {
// add the image, title etc to emailBody (as HTML)
}
varaddresses = getFriends_();
for(variinaddresses) {
var email = email_header + form_key + emailBody + email_footer;
MailApp.sendEmail(addresses[i],"Movie tonight?", "", {htmlBody: email});
}
Check out the documentation and get started building your scripts - we look forward to seeing your gallery submissions. To share your masterpiece with the world, select Share -> Publish Script...from the script editor - its that easy!
Also, for those attending Google I/O this year, be sure check out the Google Apps Script talk on the Enterprise track.
Posted by Nikhil Singhal, Google Apps Script Engineer

Monday, March 2, 2015
Show Off Your Classroom!
I have to admit, I almost missed Mrs. Fultzs linky party because I really wanted to take some updated photos of my classroom, but seeing that this linky ends tonight, I want to be sure to show off some of my favorite things.. even if these pictures are from September!
 Yes, Im starting with this! I am so lucky to have a play Kitchen in my classroom! I also have a block area, but I dont have a picture of it! The kids absolutely love playing here, and it helps develop their socialization skills and their sorting skills (foods need to be put in the right baskets, same with the utensils and cups. Mostly, its a great place for the kids to just PLAY!
 This was probably one of my favorite things that I did (or that my mom did!) This summer, I read the book Spaces and Places by Debbie Diller and one of the amazing tips in the book is to use curtains to hide all of your things! I went to the Christmas Tree Shop and bought these purple Kitchen curtains and my mom helped me trim them to the right size.
In the book, Debbie Diller recommends hanging them with velcro, but since I started with actual curtains, I used a tension rod to hang them up so I wouldnt need glue or screws. The curtain on the right spans an 89" length so that one needed some hooks to help hold it up, but it helps hide all of my things and it looks so pretty! I also have matching cushions for the computer chairs, but again... these pictures were from September!
 Wow, my walls are empty! But again, heres my use of curtains to cover up my bookshelves! I hung them up with curtain rods. These are my cubbies also... I know the colors dont go so well in my classroom, but they work just fine! Another thing that I love in this picture is my daisy tables... perfect for Kindergarten!
 This picture has my library area and meeting area... the green bench doubles as a seat during reading time and a step to help us reach the smartboard, and the laundry basket has some nice pillows for cozy reading time!
Around the carpet, those green and yellow papers are my students blurred out names. I have the class sit along the outer edge of the carpet for the most part, though theyll move to their "smartboard seats" when were doing something on the board. I use those names through November/December to help students remember where they sit!
 My pride and joy... my shelves! I put these up myself!!! I even used an electric screw gun, a level, and toggle bolts for the metal studs. I am so glad I put these up!!! And yes... that is a mini-fridge! Im so glad I brought it in, it is the best!
To the left of this picture, the blurry art is a mixed media piece using oil pastels and watercolor paint to practice writing our name (hence the blur!)
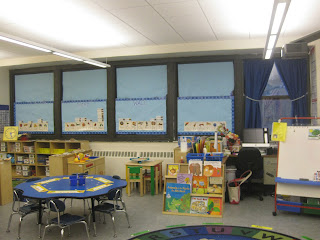 Clearly my bookshelf shows that this was from September! Anyway... more curtains, this time being used as they should be... to block the light.
This picture also shows my covered up windows :/ I have mixed feelings about this... unfortunately, it was the only place to put a word wall that was visible from everyones seats, and I was hoping that some light would come through the papers, but that didnt happen because of this:
 I had this wonderful idea to do an outdoor bulletin board... the blurry box has the name of our school on it.
I put up the following from the inside of my windows facing out. When I covered the windows in bulletin board paper (lots of effort and lots of tape!), the light was going through the windows and you could see the mirror image of "If you can dream it, you can do it..." shining onto our floor every time it was sunny out. I had to cover the bulletin board paper with black poster boards, then again with pretty bulletin board paper just to keep the sun out. It literally took a full day and a half just to do this project. And it ended up completely blocking all of the sunlight from the windows.
Now... the pros to this:
1. It was absolutely amazing looking from the outside!
2. I had no blinds on the windows so it helped block the light.
But the cons to this:
1. It fully blocks the light on four of my wonderful windows.
Im not sure if Ill be doing this one again next year because of that one major con, but well see!
Im linking up my classroom with Mrs. Fultzs Linky Party, stop by there to check out some other amazing classrooms!

Read more »
In the book, Debbie Diller recommends hanging them with velcro, but since I started with actual curtains, I used a tension rod to hang them up so I wouldnt need glue or screws. The curtain on the right spans an 89" length so that one needed some hooks to help hold it up, but it helps hide all of my things and it looks so pretty! I also have matching cushions for the computer chairs, but again... these pictures were from September!
Around the carpet, those green and yellow papers are my students blurred out names. I have the class sit along the outer edge of the carpet for the most part, though theyll move to their "smartboard seats" when were doing something on the board. I use those names through November/December to help students remember where they sit!
To the left of this picture, the blurry art is a mixed media piece using oil pastels and watercolor paint to practice writing our name (hence the blur!)
This picture also shows my covered up windows :/ I have mixed feelings about this... unfortunately, it was the only place to put a word wall that was visible from everyones seats, and I was hoping that some light would come through the papers, but that didnt happen because of this:
I put up the following from the inside of my windows facing out. When I covered the windows in bulletin board paper (lots of effort and lots of tape!), the light was going through the windows and you could see the mirror image of "If you can dream it, you can do it..." shining onto our floor every time it was sunny out. I had to cover the bulletin board paper with black poster boards, then again with pretty bulletin board paper just to keep the sun out. It literally took a full day and a half just to do this project. And it ended up completely blocking all of the sunlight from the windows.
Now... the pros to this:
1. It was absolutely amazing looking from the outside!
2. I had no blinds on the windows so it helped block the light.
But the cons to this:
1. It fully blocks the light on four of my wonderful windows.
Im not sure if Ill be doing this one again next year because of that one major con, but well see!
Im linking up my classroom with Mrs. Fultzs Linky Party, stop by there to check out some other amazing classrooms!
Sunday, March 1, 2015
Managing Your Computers Headphones!
For some reason it drives me crazy how sloppy all the cords around the computers are... and the headphones are always the worst. They get tangled, they fall down and somehow they get bent and crooked! For a while, I had my students put their headphones over the computer, but that just made the computer screen get greasy and sweaty, so that habit didnt last too long!
Well... I finally had an epiphany: jumbo command hooks!

I bought the large command hooks off Amazon - a 3 pack for less than $7... not too bad! Theyve held up for about a week now and I love them! You can click the picture below to see which hooks I bought for my classroom... they seem to be the perfect size for our jumbo headphones!

Read more »
Well... I finally had an epiphany: jumbo command hooks!
I bought the large command hooks off Amazon - a 3 pack for less than $7... not too bad! Theyve held up for about a week now and I love them! You can click the picture below to see which hooks I bought for my classroom... they seem to be the perfect size for our jumbo headphones!
Thursday, February 26, 2015
Get Your Kids To Write Their Name on Their Work!
Im starting to go through my plans for the beginning of the year and I found a bunch of things that I want to add to my blog... and many of them Ill be adding as freebies! Soo... heres the first freebie!
Years ago I learned the first verse of this song from a preschool teacher at my previous job. So, my first year teaching Kindergarten, I obviously used it a LOT with my kiddos.
I was absolutely amazed when my students added new verses to the song! Thats right... my students wrote the second and third verses of this song! I absolutely love how creative they were and I use all three verses with my students nowadays!
I added this file to TPT as a PowerPoint file so you can insert your own name into it, and I even embedded the font into the document so it should load up on your computer perfectly. I havent actually done the embedding before so I hope it works!
Click the picture below to download the song!

How do you get your kiddos to remember to write their names on their paper?
Read more »
Years ago I learned the first verse of this song from a preschool teacher at my previous job. So, my first year teaching Kindergarten, I obviously used it a LOT with my kiddos.
I was absolutely amazed when my students added new verses to the song! Thats right... my students wrote the second and third verses of this song! I absolutely love how creative they were and I use all three verses with my students nowadays!
I added this file to TPT as a PowerPoint file so you can insert your own name into it, and I even embedded the font into the document so it should load up on your computer perfectly. I havent actually done the embedding before so I hope it works!
Click the picture below to download the song!
How do you get your kiddos to remember to write their names on their paper?
Get Your Students Using Silent Signals Freebie!
Ive heard about the hand signals that teachers all over use, and I absolutely loved the idea, but I wanted to do something a bit different with my class. I thought back to when I was in elementary school and one of my teachers taught us the pledge in sign language. I have a second cousin who is deaf and speaks sign language, and I thought it was the coolest thing to learn something that I could use to "communicate" with him.
So... it hit me! I decided to teach my class sign language!
We learned so many different words, and my students constantly asked if we could go to the website Signing Savvy to learn more! It totally revolutionized my classroom. Suddenly, everything was sign language. No longer did students call out "Is it time to erase the board yet?" Instead, they used sign language!
Click the pictures below to see an animated video to learn how to sign each of the words, then download the poster at the bottom of the page to post in your classroom as a reminder to your students!


For the next two words, we combine two different signs.
.JPG)
.JPG)
.JPG)


Heres a free accompanying poster to hang in your classroom!
To save the file, just click the image to get to the higher quality picture, then right click (or Mac: Ctrl + Click) to save the image onto your computer!

Read more »
So... it hit me! I decided to teach my class sign language!
We learned so many different words, and my students constantly asked if we could go to the website Signing Savvy to learn more! It totally revolutionized my classroom. Suddenly, everything was sign language. No longer did students call out "Is it time to erase the board yet?" Instead, they used sign language!
Click the pictures below to see an animated video to learn how to sign each of the words, then download the poster at the bottom of the page to post in your classroom as a reminder to your students!
Note: The reason I link to this version of light is its similar to the option for overhead lights that other signing websites use.
For the next two words, we combine two different signs.
Note: The action cup refers to a previous post I had written about:
Heres a free accompanying poster to hang in your classroom!
To save the file, just click the image to get to the higher quality picture, then right click (or Mac: Ctrl + Click) to save the image onto your computer!
Wednesday, February 25, 2015
How to Put a Watermark on Your Photo
Thank you everyone for voting on the technology poll! This week, the winner was How to Put a Watermark on a Photo!!!

Again, more than half of you voted for this in the poll!

I included two versions of this tutorial. In light blue, youll find directions on how to do everything right in GimpShop. Honestly, this is what I tend to do, as Im pretty comfortable using the program. For those of you who feel overwhelmed by the Gimp interface, I included alternate directions (in a medium blue) which include a brief portion in Gimp, and the remainder of the tutorial in Gimp. They both have the same effect, so its totally up to you!
Before I start the tutorial this focuses on how to use an image as a watermark. If you want to add text on your picture, click the picture below to check out my previous tutorial:

Now... onto the tutorial!


Now, for the tutorial that incorporates PowerPoint!


As far as next weeks poll is concerned, I just came across a MAJOR find in PowerPoint... Do you remember my previous post on giving a picture a transparent background? Well... I just stumbled across a way to do this right in PowerPoint!!! So obviously that will be on next weeks poll!

Read more »
Again, more than half of you voted for this in the poll!
I included two versions of this tutorial. In light blue, youll find directions on how to do everything right in GimpShop. Honestly, this is what I tend to do, as Im pretty comfortable using the program. For those of you who feel overwhelmed by the Gimp interface, I included alternate directions (in a medium blue) which include a brief portion in Gimp, and the remainder of the tutorial in Gimp. They both have the same effect, so its totally up to you!
Now... onto the tutorial!
Now, for the tutorial that incorporates PowerPoint!
You can download this tutorial as a PDF by clicking this picture!
Note: This tutorial is hosted on Google Docs. To save it from there, just open the file and click File > Download to save onto your computer!
If you want to grab the cootie catchers from the picture, click the picture below!
As far as next weeks poll is concerned, I just came across a MAJOR find in PowerPoint... Do you remember my previous post on giving a picture a transparent background? Well... I just stumbled across a way to do this right in PowerPoint!!! So obviously that will be on next weeks poll!
How to See What Your Most Popular Blog Posts Are
This little trick is another one of my favorites. When I think about what option to add to the Technology Tuesday poll, I also try to think about what my most popular blog posts are - ones are benefit teachers in different grade levels. For new bloggers, this can also help you to write more relevant posts... ones that your current followers are loving. Plus, its nice to see that all of that hard work writing fabulous blog posts is paying off!


Now, for the quick and easy tutorial!

For next weeks poll, Ill add another Blogger tutorial... how to see how many people follow you by email!
Read more »
This option just barely snuck into the lead on the poll!
Now, for the quick and easy tutorial!
You can download this tutorial as a PDF by clicking this picture!
Note: This tutorial is hosted on Google Drive. To save it from there, just open the file and click File > Download to save onto your computer!
For next weeks poll, Ill add another Blogger tutorial... how to see how many people follow you by email!
Thursday, February 12, 2015
How to Write Compile and Run Your First Java Program
Before running Java programs you need to install and setup java. For installation guide read: Java Installation: Downloading, Installing and Setting Path
How to write and run Java programs?
- Open notepad and write below program.
class demo
{
public static void main(String...S)
{
System.out.println("Java Programming");
}
}

- Now save the file with name demo.java on desktop. Here you can replace demo with any other name that you want.
- Then open command prompt (cmd) and type cd desktop and press enter to change current directory to desktop. We changed directory because our program is saved on desktop.

- To compile java program type javac demo.java and hit enter. Type java demo to run the program. Remember that here we have to compile with program name and execute with class name that we have used in program. The java program name and class name can be different.

Understand the Program

System: Get reference id of the device on which program is running. Here the device is cmd.
out: Store the reference id of device.
println: Throw the output on device.
A.java | A.java | A.java | |
class A { } | class A { public static void main() { } } | ||
compile | Yes | Yes | Yes |
.class file | Not created | Created | Created |
execute | No | No | Yes |
Tuesday, February 3, 2015
Remove password pattern lock gmail account in your O 8 31
This is an alternative way to factory reset your O+ 8.31 without android system recovery. Sometimes this phone does not come up with android system recovery.
We need to use PC to factory reset your phone. Because this phone does not have an android system recovery. But the alternative for that is the fastboot mode.

You can do this in Windows and Linux OS.
First you need to download a file.
1. ADB Fastboot Driver --> Download Here
2. ADB Fastboot Tools -- >Download Here
After Downloading all the files. And install first the driver.
Hard resetting / factory resetting your phone will solve the following issues:
1. If you forgot your pattern lock
2. If you forgot your gmail account
3. If you forgot your password
4. Apps that automatically force closing
5. Stuck in Logo Only (sometimes does not work if the firmware is totally damage)
NOTE: Performing hard reset / factory reset will erase your data.
Using fastboot command.
1.Turn off your phone
2. Press and Hold Volume Down and Power button together
3. A fastboot word in your phone will appear
4. Connect your phone in the PC via USB, the driver will automatically install
5. Go to the file that you extracted and look for commandprompt.bat
6. In command prompt type this two command below
7. Wait for your phone to reboot properly.
fastboot -w
fastboot reboot
LINUX Mode
First you need to update your package manager and download fastboot tools for android.
Here is how to download it
1. Open terminal or press this ctrl + alt + T and it will open
up Terminal, this is for Ubuntu, Lubuntu command that I have tried.
2. Then in terminal type the following command
sudo apt-get update
sudo apt-get install android-tools-fastboot
3. After installing it enter FASTBOOT mode in your phone.
4. Go to terminal again and execute this command
sudo fastboot -w
sudo fastboot reboot
NOTE: In linux you can only install android-tools-xxxxxx in Ubuntu 13.04 and above version same as with Debian base distro you can only install it in Debian 7.
I hope this tutorial helps you. If you have any questions just drop a commend below.
Hard Reset your O 8 3 Android and remove password pattern lock and gmail account
Another tutorial for O+ brand, and this time it is for the O+ 8.3. I also have the stock rom for this phone. So just check out my blog post is you need to reflash your phone.

Hard resetting / factory resetting your phone will solve the following issues:
1. If you forgot your pattern lock
2. If you forgot your gmail account
3. If you forgot your password
4. Apps that automatically force closing
5. Stuck in O+ Logo (sometimes does not work if the firmware is totally damage)
NOTE: Performing hard reset will erase your data.
To hard reset:
1. Turn off your phone.
2. Press and Hold first the POWER Button and then immediately Press and HOLD VOLUME UP until you see the Android Robot.
3. Press the HOME Button to activate Android System Recovery
4. Select wipe / factory reset, press Volume rocker to navigate and press the Option Capacitive Button or Sensor(Third Capacitive Button or Sensor) to confirm your selection
5. Reboot your phone.
Note:
If performing hard reset did not succeed, you need to wipe the cache first in the android system recovery before performing wipe / factory reset.
I hope this tutorial helps you.. If you have any question just drop a comment.
Hard Reset your Huawei Ascend Y210 Y210D and remove password pattern lock and gmail account
Check out this tutorial for Huawei Y210 for removing password, pattern lock and gmail account. This is a brand an old phone already.

Hard resetting / factory resetting your phone will solve the following issues:
1. If you forgot your pattern lock
2. If you forgot your gmail account
3. If you forgot your password
4. Apps that automatically force closing
5. Stuck in Huawei Logo (sometimes does not work if the firmware is totally damage)
NOTE: Performing hard reset will erase your data.
To hard reset:
1. Turn off your phone
2. Press and Hold Volume UP + Power Button simultaneously
3. Unhold the power button when the phone power up but do not release the volume up.
4. An Android with exclamation will appear, just wait for it for the Android System Recovery to appear
5. Select wipe / factory reset, press Volume rocker to navigate and press the Power Button to confirm the selection
6. Reboot your phone.
Note:
If performing hard reset did not succeed, you need to wipe the cache
first in the android system recovery before performing wipe / factory
reset.
I hope this tutorial helps you.. If you have any question just drop a comment.
Read more »
Hard resetting / factory resetting your phone will solve the following issues:
1. If you forgot your pattern lock
2. If you forgot your gmail account
3. If you forgot your password
4. Apps that automatically force closing
5. Stuck in Huawei Logo (sometimes does not work if the firmware is totally damage)
NOTE: Performing hard reset will erase your data.
To hard reset:
1. Turn off your phone
2. Press and Hold Volume UP + Power Button simultaneously
3. Unhold the power button when the phone power up but do not release the volume up.
4. An Android with exclamation will appear, just wait for it for the Android System Recovery to appear
5. Select wipe / factory reset, press Volume rocker to navigate and press the Power Button to confirm the selection
6. Reboot your phone.
Note:
If performing hard reset did not succeed, you need to wipe the cache
first in the android system recovery before performing wipe / factory
reset.
I hope this tutorial helps you.. If you have any question just drop a comment.
Subscribe to:
Posts (Atom)